
Requirements
This little recipe uses:
Astro Setup
Note: My preferred package manager is pnpm (though I use bun occasionally), so my commands are pnpm based here.
- Create an astro project:
pnpm create astro@latestWhile going through the setup use TypeScript. Even if you don’t know it, you can use this to learn. Plus Astro DB makes working with Turso typesafe.
- Create a
.envfile with this content. We’ll add more it later:
ASTRO_DB_REMOTE_URL=
ASTRO_DB_APP_TOKEN=
Turso setup
- You will need a Turso account.
They have incredibly generous plans, including a free plan.
- Turso has a guide for how to set up their CLI. Pick the option that fits your operating system.
Note: For this tutorial, you really only need to do step 1 and 2 in their guide. However, you can use their guide to do more and their docs are rather awesome.
Second Note: As we’re going to be using astro db, we’re not going to be using the cli for this guide, although you can use it to generate your tokens. I just want you to see the Turso dashboard!
-
Either use the CLI or login to your dashboard and create a database.
-
In the overview screen in your dashboard on Turso, click on the 3 dots and select Create Token. Make sure that token has the ability to Read & Write to the database.
You will be presented with 2 strings. The first one is the Remote URL, the second is your Token.
Tell Astro about Turso
- Add these values to your
.envfile in the appropriate place:
ASTRO_DB_REMOTE_URL=<STARTS WITH libsql://>
ASTRO_DB_APP_TOKEN=<REALLY LONG URL STRING>
Keep these variables secret!
Add Astro DB to project
- Command to add to project
pnpm astro add dbAstro’s astro db is built on drizzle, making working with the database nice and easy. This is what we’re going to use to build our database schema and even use seed data locally to test without impacting our production database.
The documentation for astro db is very nice too.
CRITICAL: Update your astro config
- Open your
./astro.config.mjsfile.
The default output for an Astro project is a static site. To make use of non static data, you must change the output of your build.
// @ts-check
import { defineConfig } from 'astro/config'

import db from '@astrojs/db'

// https://astro.build/config
export default defineConfig({
output: 'server', // Required change. Pick either hybrid or server.
integrations: [db()],
})
If you do not include this, you may get a TypeScript error saying that astro:db has no export for the table names you create in your schema.
If you pick “hybrid” you will see a warning message:
[WARN] `Astro.request.headers` is unavailable in "static" output mode, and in prerendered pages within "hybrid" and "server" output modes. If you need access to request headers, make sure that `output` is configured as either `"server"` or `output: "hybrid"` in your config file, and that the page accessing the headers is rendered on-demand.This can be ignored if you’re not doing anything with that, but keep that in mind if you plan on using it. For this test, I’m using output: "server" so it doesn’t spam my terminal.
Create your schema
For this example, we’re doing a comment system, something static sites do not come with by default.
- In your project open up the file
./db/config.ts
import { defineDb, defineTable, column, NOW } from 'astro:db'

const Author = defineTable({
	columns: {
		authorId: column.number({ primaryKey: true }),
		author: column.text(),
	},
})

const Comment = defineTable({
	columns: {
		commentId: column.number({ primaryKey: true }),
		body: column.text(),
		date: column.date({ default: NOW }),
		authorId: column.number({ references: () => Author.columns.authorId }),
	},
})

// https://astro.build/db/config
export default defineDb({
	tables: {
		Author,
		Comment,
	},
})
Explanation:
- We have two tables:
AuthorandComment - The Author table has two columns:
authorIdwhich is a primary key for tracking authorsauthorfor storing the name of the author
- The Comment table has 4 columns: commentId
commentidwhich is the primary key for tracking commentsbodyfor storing the commentdatefor storing when the comment was made. It uses the default ofNOWwhich will auto populate with the date the record was created for the commentauthorIdwhich is treated like a foreign key linking it to the author table
Create seed data to work with locally
- Open the file
./db/seed.tsand put in some test data that follows the schema you created.
import { db, Comment, Author } from 'astro:db'

// https://astro.build/db/seed
export default async function seed() {
// TODO
await db.insert(Author).values([
{ authorId: 3, author: 'Jane Doe' },
{ authorId: 4, author: 'John Doe' },
])

    await db.insert(Comment).values([
    	{ commentId: 1, body: "Hey, it's awesome!", authorId: 3 },
    	{ commentId: 2, body: "Yo, it's not awesome", authorId: 4 },
    ])

}
Testing local db schema before pushing to Turso
- Let’s create a test to see how this all works. Open your
./src/pages/index.astrofile:
---
// index.astro file
import { db, Comment } from 'astro:db'

const comments = await db.select().from(Comment)
---

<html>
	<head>
		<title>Testing Comment Database</title>
	</head>
	<body>
		<h2>Comments</h2>

		{
			comments.map(({ author, body }) => (
				<article>
					<p>Author: {author}</p>
					<p>{body}</p>
				</article>
			))
		}
	</body>
</html>- Start up the server:
pnpm dev. You will see output that looks like this:
astro  v4.16.1 ready in 206 ms

┃ Local    http://localhost:4321/
┃ Network  use --host to expose

12:22:07 watching for file changes...
12:22:07 [astro:db] New local database created.
12:22:07 [astro:db] Seeded database.
Those last two lines are important. It means that locally, we now have a sqLite database that has been seeded with our fake date.
- Visit site to see output and notice what is showing:
Comments
Author:

Hey, it's awesome!

Author:

Yo, it's not awesome
Horray! Partial Success!
We can see it’s getting the fake comment data from our database, but it’s not showing the author’s name. So let’s fix that:
---
import { db, Comment } from 'astro:db'

const comments = await db.select().from(Comment)
---

<html>
	<head>
		<title>Testing Comment Database</title>
	</head>
	<body>
		<h2>Comments</h2>

		{
			comments.map(({ authorId, body }) => (
				<article>
					<p>Author: {authorId}</p>
					<p>{body}</p>
				</article>
			))
		}
	</body>
</html>
That gets us the id for our author, so we’re on the right track.
- Grabbing the data for both and combining them together.
To do this we’re going to do an inner join on the two tables where the Comment authorID matches (or equals) the Author table’s authorId. Then we’ll destructure the response in our map.
---
import { db, eq, Comment, Author } from 'astro:db'

const comments = await db
	.select()
	.from(Comment)
	.innerJoin(Author, eq(Comment.authorId, Author.authorId))
---

<html>
	<head>
		<title>Testing Comment Database</title>
	</head>
	<body>
		<h2>Comments</h2>

		{
			comments.map(({ Comment: { body, date }, Author: { author } }) => (
				<article>
					<p>Author: {author}</p>
					<p>Body: {body}</p>
					<p>Date: {date}</p>
				</article>
			))
		}
	</body>
</html>
Our result?
Comments
Author: Jane Doe

Body: Hey, it's awesome!

Date: Sat Oct 12 2024 12:22:07 GMT+0100 (British Summer Time)

Author: John Doe

Body: Yo, it's not awesome

Date: Sat Oct 12 2024 12:22:07 GMT+0100 (British Summer Time)
Sweet! But … now what?
Well, now we want to actually push our schema up to Turso for use. Note: the seed data is only for use for seeding our local sqLite database so that data will not be pushed up.
Doing it remotely
- Pushing our schema to turso
Locally, we’re all good. So now let’s push that up to Turso.
We can do that with this command pnpm astro db push --remote
We are informed of our success:
Database schema is out of date.
Pushing database schema updates...
Push complete!- Now let’s check our dashboard on Turso.
In our dashboard, we can go to our database, click on “Edit Data”. For this I am using the “Drizzle Studio” option.
Image Credit: SudoMistress
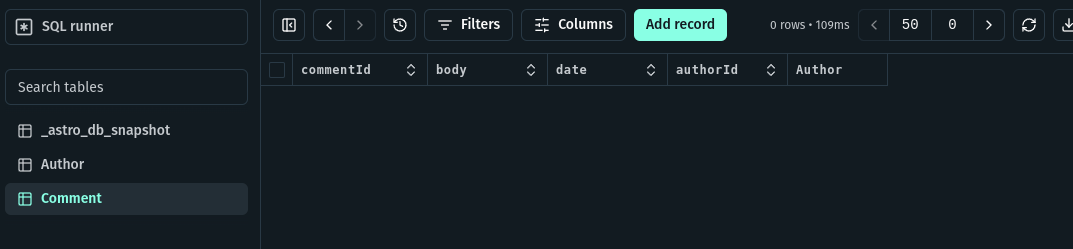
Nice! And as pointed out before, there is no data in these files. The seed is local only.
- Add records in Turso.
Let’s add some records to our “production” database!
Starting with the Author table, because the Comment table references the Author Table:
Image Credit: SudoMistress
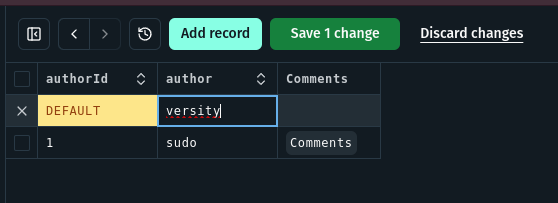
Note I am only adding in the author, and not a number for authorId because that field is a primary key in my schema and turso’s set up to auto-increment! Talk about saving time!
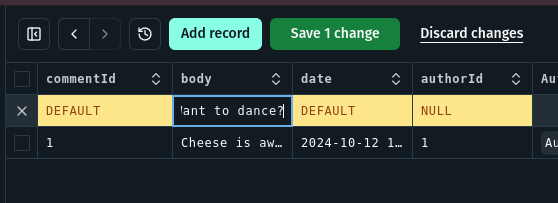
As an added bonus, because commendId is a primary key, and I set the schema to ensure that the date was NOW, I only have to add the body, and the number for the authorID that matches one in the Author table.
Image Credit: SudoMistress
Now to make use of this data.
- Use the remote data locally.
So, we do not want to use our seed data anymore, we’re wanting to use the data in the database that we set up on Turso.
Astro db has a nice command to do this without hassle: pnpm dev --remote. By using the --remote flag when we start up our dev, we’re telling Astro, “Hey, when I make any call using db, go out to the interwebs (specifically the URL we set up in our .env file at the start), and make all the calls there!”
The result?
Comments
Author: sudo

Body: Cheese is awesome

Date: Sat Oct 12 2024 13:07:51 GMT+0100 (British Summer Time)

Author: versity

Body: Want to dance?

Date: Sat Oct 12 2024 13:12:42 GMT+0100 (British Summer Time)
Different than our seed data! Success!
But what if the site is production?
Then it’s time to explore on-demand rendering and SSR (server side rendering) adpaters.
You can also create your own API endpoint on your site to handle that.
You can learn more about that here.
Conclusion
Hopefully you can see the power of combining Astro, Turso, and Astro db. May your static sites, occasionally, offer more than just simple functionality.